


AML Frequently asked questions
Q. What will the AML locate?
The AML will locate anything with and edge larger than 15″ such as a pipe composed of PVC, HDPE, Transite, Copper Steel, Wood, Concrete, Clay, Cast Iron, etc.
Q. How does it locate? What is the theory behind it?
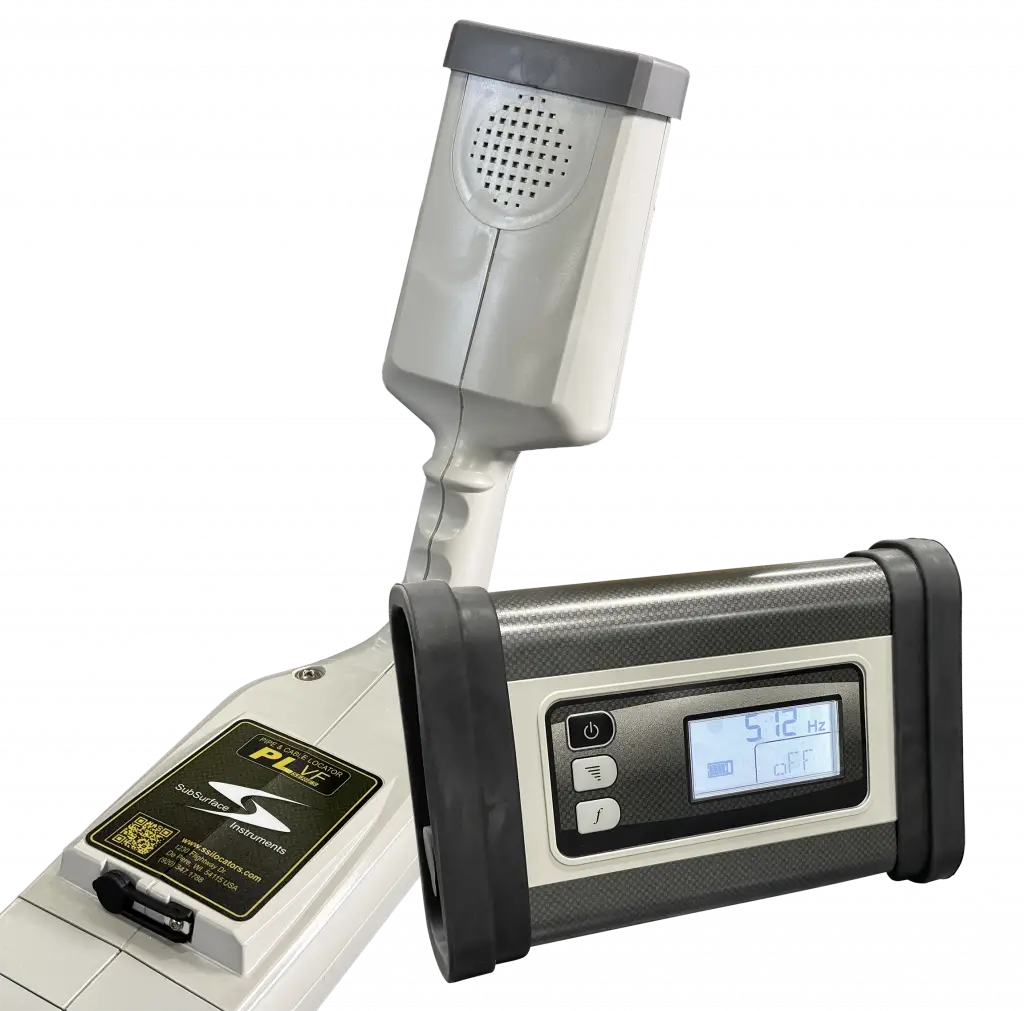
The AML works on finding changes in density, When the AML scans an area, it recognizes a change and refracts the signal of the object back to the four receiver antennas in the AML. If antennas on both sides of the AML receive refracted signal, both red lights will turn on. If only antennas on one side of the AML receive refracted signal, then only that side red light will turn on.
Q. What are the differences in the settings?
The higher the number, the “hotter” or more sensitive the AML’s signal is.
-HOW DO I CHOOSE A GAIN SETTING?
The AML Plus offers sensitivity levels from 1 to 9, while the AML Pro ranges from 1 to 32. When scanning over concrete, asphalt, or gravel roads, set the AML Plus between levels 5 and 9. On the AML Pro, use levels 15 to 24, since position 9 on the AML Plus is relative to position 32 on the AML Pro. For parking lots, driveways, or sidewalks, use lower sensitivity: 1–6 on the AML Plus or 3–9 on the AML Pro.
-WHICH GAIN SETTING IS HOTTEST/COOLEST?
9 or 32 is the “hottest” or “most sensitive” setting, 1 is the “coolest” or “less sensitive” setting.
Q. How do I determine size of a pipe or an object?
Locate one edge of the pipe as accurately as you can, remembering the 10° angle of the blade and mark it with paint; then scan for the other edge of the pipe -locate it as accurate as you can- mark this second spot with paint, the distance between the two paint marks will be the approximate diameter of the pipe.
Q. What does it mean when both red lights are on?
It means that an object of 15″ or more has been located, both red lights and an audible signal will be activated, as well as the red laser point that will indicate the center point on the ground where the density change has been located, at this point the depth of the density change may not be known.
Q. When I have to be extremely accurate, how should I hold the AML Pro?
To be the most accurate, the handle of the AML most be hold at a 10° upward angle, with the battery cap at the higher end of the angle, allowing the blade face to be perfectly perpendicular to the ground.
-SHOULD I USE THE HANDLE AS MY REFERENCE?
Handheld it at a 10° angle from the ground. The AML blade face is built with a 10° angle from the handle, to eliminate false reading that can be created by the feet of the technician operating the unit.
Q. How will I know when the pipe ends or comes to a "T"?
Identifying the end of a pipe is easy. As you follow the edge of the pipe, pay attention to the red lights, when one of them turns off it may indicate the end of the pipe, back up the unit until both lights are on again and slowly move the unit until the light goes off, now turn the unit left or right using the side of the AML where the light is still on as a pivot point, keep turning and if both lights come on again it means the pipe made a 90° turn or you found a “T”. Continue scanning the pipe with the locating method you were using before.
Q. What kind of soil conditions may affect the AML's performance?
These soil conditions could be: Rocky regions, heavily wooded areas, corn fields, landfills, high grassy areas and areas with a lot of bushes.
Q. How do I know when to change batteries?
In the AML Plus the green power light, will turn red and green intermittently when the power is low.
In the AML Pro the screen will display a message of LOW BAT in the upper right hand corner, once the message is displayed you have about 5 minutes to replace the battery before the unit turns it-self off. Always turn the unit off before replacing batteries.
-HOW LONG WILL THE BATTERIES LAST?
Battery will last up to 10 hours of full use, depending on the amount of targets acquired, the speaker volume used when locating and the model.
Q. When on the edge of a pipe, why do I lose signal just by raising or lowering the AML by an inch or two?
Loss of signal may occur when directly above an edge of a pipe due to the refracted Radio signal being read by the antennas. There are areas of the radio frequency that the antennas miss, creating null zones as the unit is raised or lowed. Both lights will come on then go off approximately every 2 inches when the antennas are located inside of these null zones. A gentle flicker up and down or a vertical motion will allow the pipe to be accurately re-located.
Q. Do these locators need to be calibrated or sent in for calibration?
AML Plus Calibration
The AML Plus comes factory-calibrated, but you can re-calibrate it if needed. To do this, connect the unit to a computer and use the SubSurface Instruments calibration software. You may either:
Send the unit back to the factory for re-calibration, or
Contact us for database access, download the software, and follow the step-by-step guide to complete the re-calibration yourself.
AML Pro Calibration
The AML Pro includes a built-in calibration check utility. To calibrate:
Enter the MENU and select CALIBRATE.
Press the SEL button to change the command from 00 to 10.
Press the MENU button again.
Slowly raise the AML Pro toward an unobstructed sky until the screen shows a 45º inclination and displays “WAIT.”
Hold that position for about 10 seconds. The screen will display PASS or FAIL.
If FAIL appears, move to a different location or point the unit in another direction, then repeat the steps.
Q. Can I use the AML in the rain?
All highly sensitive digital locators are best not used in heavy rain. Do not use for long periods of time in the rain, cover the unit with a clear piece of plastic. These units are water resistant, but not water proof. If the AML is put in the carrying case wet, is a recommended practice to take the unit out of the case and let it dry over night, with the battery sleeve removed and the battery cap left off.
Q. Why do I get a reading in spots where I know there are no pipes or cables?
The AML is a highly sensitive unit when it’s set to the higher level of sensitivity. It may detect very small changes of density. Once you find the edge of your targeted object, use the lowest level possible that will still locate that objects edge. This will reduce the possibility of getting unwanted, inaccurate locates.